


Overview
Quarto is an open-source scientific and technical publishing system that allows you to create and share interactive documents, presentations, dashboards, and reports. This article provides a step-by-step guide to creating a website with Quarto and getting it up and running. We'll start by setting up your project directory and walk you through the entire process with a reproducible example. You'll see just how easy it is to create and publish your website in no time!
 Tip
TipBefore diving into this example, you might want to explore these resources:
- Quarto Setup Guide for detailed instructions on installing Quarto.
- Create Your First Document with Quarto to get familiar with its basic functionalities.
- Create an Automated Report with Quarto including an example that this topic builds upon.
Setting up the project
You can create a website with Quarto by combining .qmd documents into a single project. Follow these steps to set up your project directory:
-
Open VS code as your Markdown editor.
-
Create a Quarto Website project within VS Code: - Go to "File" -> "New File". Type "Quarto Project" and select "Website Project".
-
Create a new folder for your project directory, and name it, e.g.
my-first-website. -
Locate your project directory by opening the Explorer panel on the left-hand side of your VS Code screen.
- By default, an
index.qmd, andabout.qmdfile are included. - You can add any Quarto files you want to include on your website in this folder.
- By default, an
-
The
_quarto.ymlfile contains the metadata for your project.- To include additional files on your website, list them as bullet points under
- about.qmd.
- To include additional files on your website, list them as bullet points under
-
Preview the website
- Type
quarto previewin the Terminal, or click the "Preview" button under the tree-dot menu on the right-hand side of theindex.qmd. - The website will open in a new tab in VSCode, or you can
Ctrl+Clickthehttp://localhostlink to preview the HTML version in a web browser. This will show you your newly created website!
- Type
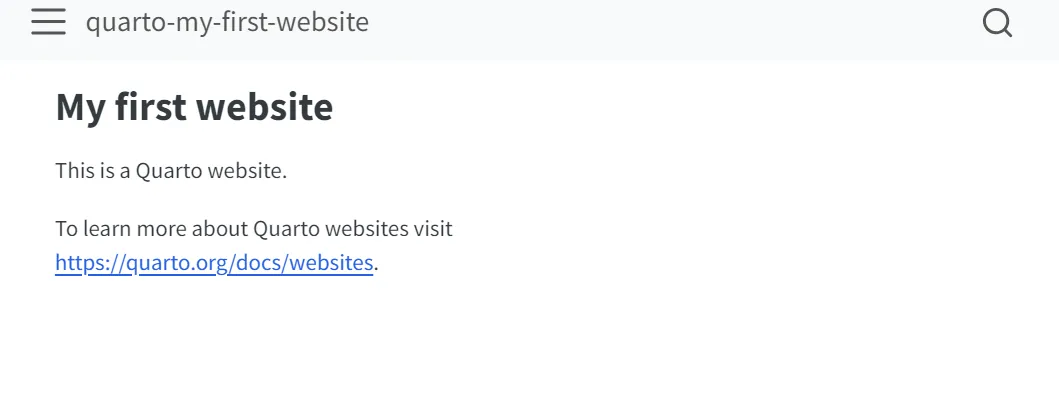
A preview of the most basic version of a newly created Quarto website:
TipControlling which files to render
By default, all valid input files in the project directory are rendered. To control which files are rendered, you can update the metadata in the _quarto.yml file. For example, to render only index.qmd and not about.qmd, list only index.qmd as a bullet point under project: render:.
Creating a website
Let's build and publish a website that includes the Quarto document from the Automating a Report article as an example. First, we'll add the right .qmd file to the project we've already created.
 Example
This Quarto report summarizes the top 5 streamed artists for the week, along with the number of plays. As a first step, streaming data is extracted from the API of the music-to-scrape website and stored in a DataFrame. The data and visualization will update automatically with each new week's data.
To follow along with this example:
- Download the Quarto file of the Automated Report yourself.
- Or download the full project directory from GitHub of this example, which is the end result.
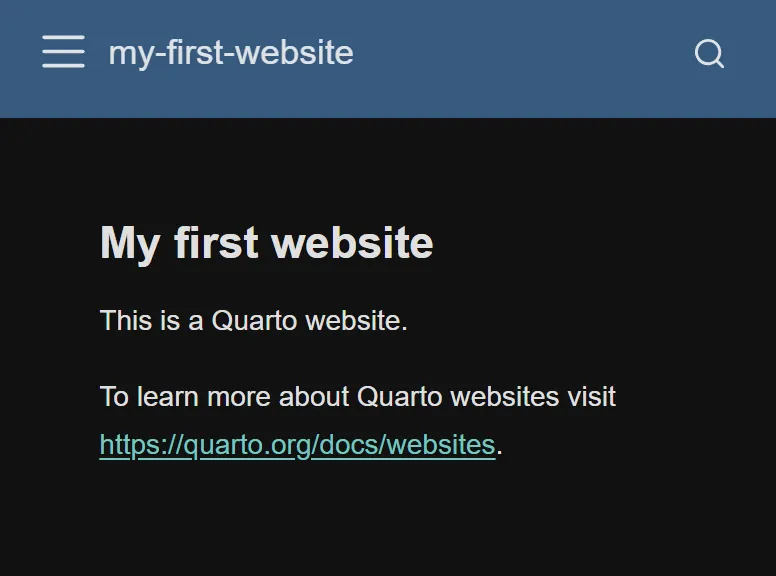
Customizing the look
Quarto offers numerous options to customize the appearance of your website. You can select an HTML theme, adjust the font size and color, and even customize the look of your code blocks, including text color and borders. Additionally, you can add callouts for notes, tips, cautions, and warnings, and customize the style of these. Explore the full range of available options here.
To give your website a clean, dark look, update your metadata file by replacing the current format section with the following:

format:
  html:
    theme: darkly # Use the Darkly theme for a dark mode
    fontsize: 1.3em # Increase the base font size
    fontcolor: "#e0e0e0" # Use a light gray color for text
    backgroundcolor: "#121212" # Set a very dark background color
    linkcolor: "#76c7c0" # Use a soft teal color for links
    mainfont: "Helvetica, sans-serif" # Use sans-serif font for the main text
    monofont: "Monaco, monospace" # Use Monaco for code elements
    monobackgroundcolor: "#333333" # Set a dark gray background for code elements
    linestretch: 1.7 # Maintain good line spacing
    margin-left: 2.5em # Adjust margins to fit the darker theme layout
    margin-right: 2.5em
    margin-top: 2.5em
    margin-bottom: 2.5em
    toc: true # Include a table of contents
    code-block-bg: "#1a1a1a" # Set the background for code blocks to a darker shade
    code-block-border-left: "#76c7c0" # Add a teal left border to code blocks
Website navigation
To enhance user experience, improve your website's navigation by adjusting the top or side menu, adding dropdown menus, and incorporating a search bar. Learn more about the options for website navigation here.
Update the metadata file by adding options to the navbar section. In our example, we configure the navigation bar on the left side with three items to help users navigate between the pages on our website: "Home" (linking to index.qmd), "Automated Report" (linking to music-automated-report.qmd) and "About" (linking to about.qmd).
navbar:
    left:
      - href: index.qmd
        text: Home
      - href: music-automated-report.qmd
        text: Automated Report
      - href: about.qmd
        text: About
Publishing the website
To publish your website, you have several options, such as Quarto Pub, GitHub Pages, and more. In this example, we'll publish the website to Quarto Pub, a free service for publicly available content. Before publishing, note that all content is publicly visible!
Follow these steps:
-
Create a free Quarto Pub account.
-
Use the
quarto publish quarto-pubcommand in the VS Code terminal within your project directory. -
When publishing for the first time, you'll need to authorize your Quarto Pub account. When prompted with
? Authorize (Y/n), typeY. -
Press Enter when prompted with
Site name:.. -
Find your published website in your Quarto Pub account or follow the link provided in the output code.
The example website created in this article is published!
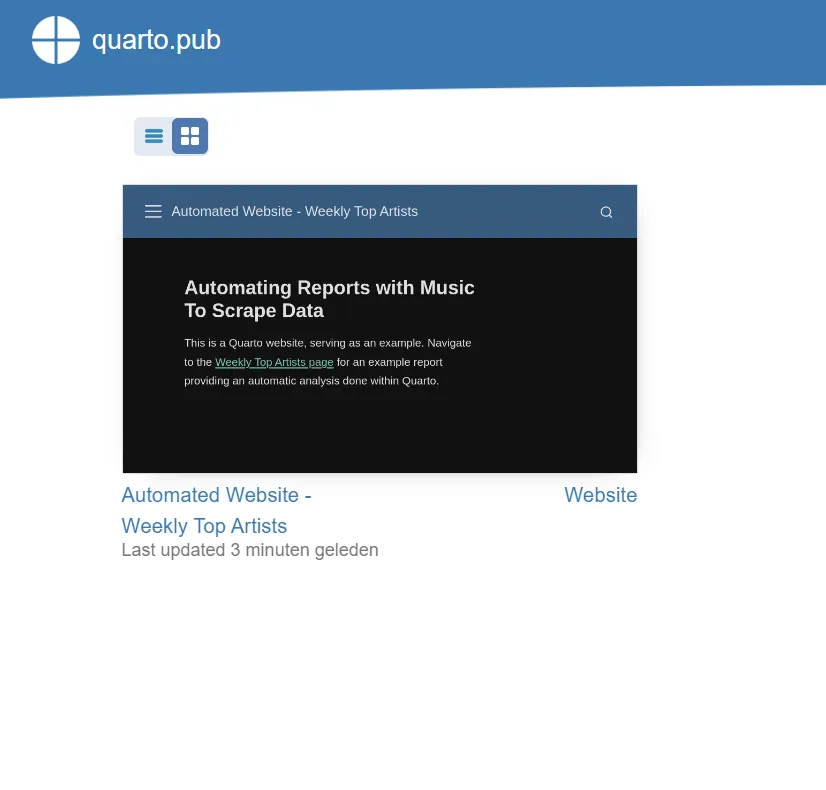
Visit the website here!
To update your website
Make the necessary changes to the Quarto files in your project directory, then run quarto publish in the terminal. When prompted to confirm the publishing destination, press Enter if the displayed URL is correct.
If you need to publish to a different location, you can update the URL in the _publish.yml file before running the quarto publish command.
 Summary
With Quarto, you have a wide range of publishing options, including the ability to create websites. In this topic, we demonstrated how to create and publish this website in just a few straightforward steps. After following this example, you'll be ready to share your impactful content with the world using Quarto Pub!